If you work from home and are into technology, it’s more than likely crossed your mind to maybe make a few YouTube – or for Gen Z, TikTok – videos. Especially if you have a capable smartphone camera and are interested in sharing your opinions (and face) with the internet, it’s worth seeing if you have the potential to be a YouTube star. Even if you don’t, it’s still a fun hobby and a great way to share your thoughts and favorite products with friends and family.

YouTube clips: How to cut and share parts of YouTube videos and streams
This handy built-in feature allows you to take a YouTube video or live stream and cut it down into shorter clips that you can share.
The first thing to tackle, like with most video or camera projects, is lighting. It’s the thing that most YouTube beginners often overlook, but your audience definitely doesn’t. To avoid your videos having deep shadows and uneven lighting, here are some tips for great lighting up-front.
3 easy ways to make your office lighting perfect
Shooting YouTube videos isn’t all that different from shooting in photography. So, if you can shoot a photo in your office, and it looks good, then chances are you can shoot a video. Thus, you can follow the same rules as any photographer when it comes to lighting your space for shooting a YouTube video.
- Use strong, even lighting. Make sure to light your subject and the background; otherwise, your video will look dark.
- Make sure you use enough lighting for your space. A few soft boxes will light a small room without significant issues.
- Make sure to keep an eye out for shadows and dark spots when setting up your lights. The camera catches everything, including mistakes.

Cam Bunton/ Pocket-lint
The photo above, which came from our Moto Razr 40 Ultra vs Razr 40 video on YouTube, is a great example of using strong, even lighting to make the background and the subject look bright, clear, and crisp.
You’ll notice Pocket-lint’s resident videographer (and our own YouTube star), Cam Bunton, not only correctly lit the subject (the two phones) but also the surface the phones are on. This lends itself to a clean overall image that looks pleasing to the eye. While Cam has years of experience in video production and editor, this is still a great example to follow and a template to aim for.
Use accent lighting to hide the darkness
Accent lighting is so en vogue right now, and it’s a potentially valuable tool to help you properly light your office space for YouTube. A smart and common method to do this is to get a light strip and affix it to the back of your desk. Once on, it splashes colorful light on the wall behind your desk, lending itself to a beautifully colorful backdrop.

Best key lights for streaming: Create content that shines
Quality lighting is “key” for making quality content, check out the top key lights to bring vibrance and color to streams, videos, and photography.
With this method, you can reduce the amount of white light you need and use the contrast and color to hide the darker parts of your set, which is your office in this case. Also, adequately executed accent lighting can hide things like wall imperfections, leading to a cleaner, more professional look without needing to break out the paint and spackle.

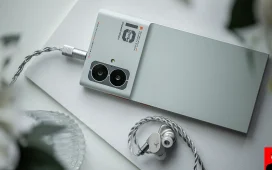
Joe Hindy/ Pocket-lint
So, in this example above, I leaned heavily on the accent lighting with no additional lighting, and you can see how good it looks. In this instance, the subject, the smartphone with Disney+, is the primary light source, and its self-emissive AMOLED screen lights itself. Thus, I can use my light strip to set the mood in the background.

Best smart bulbs: 11 illuminating options
The top smart bulbs from Govee, Phillips Hue, Nanoleaf, and more can be controlled via app or even your voice.
You don’t see the eggshell white wall with its many imperfections, as the white and blue lighting drowns out the wall’s color and imperfections. You also can’t see the scuffed-up wood desk underneath my arm and phone. It looks very clean and professional, right? It’s not; I’m just using some tricks with the light.
Choose the proper lighting products
Now you’ve seen some examples and have some general knowledge about what and how to light your office for a YouTube video. The next important step is understanding what kind of lighting you need. There are a lot of soft boxes and studio lights out there, and not all of them work for every space.
For example, my office is relatively small. I purchased full-sized soft boxes, and they’re so big and bulky that storing them between photo shoots takes up almost a quarter of my overall space. I eventually downsized to single-bulb lamps with umbrella-style diffusers. Using this setup is a bit more challenging, but it takes up less than half of the space the soft boxes did.

Joe Hindy/ Pocket-lint
The above is the type of bulb I use. However, it’s not one I recommend in 2023. I started shooting YouTube videos almost ten years ago, and LED lighting hadn’t increased the photography space in such a way that it was affordable for beginners. That absolutely isn’t the case now, and if you’re shopping for lights, I recommend opting for white temperature-adjustable LEDs as they offer a much better quality result.

Best blacklight strip lighting 2023: Never get left in the dark with these top UV-A picks
Blacklight acts a little differently from standard UV light, so learn the difference and get a strip light to match with this complete guide.
However, if you did want to buy the same type of lights I own, they’re still fairly budget-friendly. There are just better options at lower prices than there were when I was shopping years ago.
3 products that can help light your office better
So, if you’re ready to make a video and feel a bit more confident about how to get the lighting just right but are wondering which products to help you do it, here is what I’d recommend.

Feelworld F5 Pro V4
Best camera monitor
So you can see what needs to be seen
The Feelworld F5 Pro V4 is a reasonably good field monitor that attaches directly to your camera. This gives you a much better view of what your camera sees so you can make adjustments.
- Less expensive than many competitors
- Hot shoe support attaches right to the top of your camera
- USB-C input is a modern touch
- More expensive options come with more features
- Not an entirely necessary piece of equipment
A big problem for a lot of beginners is the guesswork that comes with making sure your camera shots are working for you. Taking the guesswork out of it is as easy as buying something like the Feelworld F5 Pro V4. This field monitor connects to your camera via its hot shoe mount at the top. You can then flip around and shoot yourself while still being able to see what your shot looks like.

Best cameras for beginners: Photographer tested and reviewed
Fresh to photography? The best beginner cameras can capture gorgeous photos and videos without costing a fortune.
People with articulating screen-equipped cameras may not benefit from this tool heavily, but those without will definately find the Feelworld F5 Pro V4 helpful as it allows users to see shots from the camera’s exact point of view, making lighting adjustment more accurate. Plus, the larger screen helps you really see what’s going on in your shots, so you can tweak and fix any issues before you start shooting any video.

Neewar 2-pack Bi Color 660 LED Video Light
Best lighting stand kit
Lighting that will work for most people
$175 $206 Save $31
These Neewar Bi Color 660 LED Video Lights are a great solution for lighting your office for YouTube videos. They’re bright, they’re adjustable, and they’ll flood a room with light if need be.
- They are bright, with 1320 total LEDs between the two lamps
- The white balance is adjustable, which means less blue
- They are much more compact than standard soft box lights
- At $206 when not on sale, these are expensive lights
- They can be a bit unwieldy to set up
If you’re going to go with soft boxes, this is the first product worth looking at. These Neewar lights are not only a lot more compact than a traditional softbox but also very bright. Thus, they are easier to both use and store than their lower-tech predecessors.
You’ll pay for the privilege, though, as they can top $200 when not on sale, which is not a small amount of money.
In addition, the lights are very customizable. They are dimmable, and the white balance can be adjusted from 3,200K to 5,600K, allowing you to make your light warmer or cooler at your request. That makes these very versatile as your main lighting for YouTube videos. If we’re being honest, these are on my wishlist to replace my old florescent bulbs when I can reasonably justify the expenditure.

Govee RGBIC LED Strip Lights M1
Best accent lighting
Colorful, functional, and budget-friendly
$50 $60 Save $10
The Govee M1 strip lights are a good place to start for accent lighting. They’re bright, colorful, and you can assign multiple colors to the same light strip for even more customizable.
- Bright, colorful, and customizable
- Less expensive than higher-end strip lights from Philips Hue
- Can make the strip multiple colors at once for sweet lighting effects
- Philips Hue lights, while vastly more expensive, are also a bit more reliable
- You’ll need yet another smart home app
For these Govee lights, they are very good for their price point. They cost less than Philips Hue’s competitors while becoming very bright. Plus, the IC in RGBIC means that you can choose multiple colors on the light strip at the same time, which is more versatile than single-color strands.

Govee Hexagon Light Panels Ultra review: The most impressive panels so far
They look amazing, but can they justify their hefty price tag?
This is about as good as it gets unless you want to spend about three times as much on a Philips Hue competitor.
If you could only purchase one item for better lighting, we recommend…
Feelworld F5 Pro V4
Editor’s Choice
So you can see what needs to be seen
- Less expensive than many competitors
- Hot shoe support attaches right to the top of your camera
- USB-C input is a modern touch
- More expensive options come with more features
- Not an entirely necessary piece of equipment
What kind of lighting do YouTubers use?
There isn’t one product that YouTubers use en mass. In general, they tend to follow the same types of rules rather than use the same types of products. For instance, one YouTuber may use smart lighting as accent lighting, while a lower-budget YouTuber may use Christmas lights to achieve a similar accent lighting. If you looked at the gear list for 10 different YouTubers, you’d probably get 10 different answers.
What type of lighting is best for YouTube videos?
Adjustable LED lighting all day, every day. Being able to adjust the white balance of the lights makes shooting more accurate video much easier. Plus, LEDs get super bright, so they’ll flood a room with light without any worries. If you don’t have lights, have the budget, and want to get the best available, the Neewar LED soft boxes we linked above are an excellent starting point.
How do I improve my lighting for YouTube videos?
There are two things you can do without buying any additional equipment. Experiment with light placement. If your lighting is too far away or too dim, your whole shot will look dark and uneven. Try moving the lights closer and changing the angle to cover your shooting space better. Of course, buying some extra lighting can help, too.
The other thing you can try is adjusting your camera. Bump the ISO a couple of notches or shoot at a larger aperture. Both of those options will allow the camera to let in more light, which can help bump the levels up if you come up just short of your goal.
What is the best lighting setup for YouTube videos?
One that works. While it may sound basic, that is the best possible answer, as it really depends on what you’re shooting and how you’re shooting it. For example, if you’re doing a lot of A-roll (where you’re on camera), you’ll want to make sure your face and background are lit nicely. If you use a green screen, you’ll want to make sure that it’s lit properly so that you can chroma key it out properly later.

Best portable tripods: Compact picks to keep your camera steady on the go
These portable tripods fit in your bag and mobile lifestyle to capture the perfect pictures.
For the most part, attention to detail sets average lighting and great lighting apart. Check your shadows, check your background. Try to make the most of your lights and camera settings to make everything bright, happy, and even. It’s a lot of front-loaded effort. Recreating it will be much easier once you get it right the first time. Do the work, mess around with your setup, and mess around with your camera options.